Sunday, February 26, 2012

Red Velvet Cake Pops

For Valentine's Day I made Red Velvet Cake Pops. I've been wanting to try to make these pops for a while now. I figured Valentine's Day was a good excuse.


Before I got started I bought the following items:
Candy melts
Lollypop sticks
Clear bags with ties
Foam brick

I used my favorite Magnolia Bakery red velvet cake recipe, which I halved. Once the cake cooled, I cut it into four pieces. In a bowl, I began to crumble the cake using a fork. It's a horrible feeling to completely destroy a cake into tiny crumbs, but I promise any sadness you feel will disappear when you taste these pops! Next I mixed in a can of icing...you know the ones you buy from the store. GASP! I know it's not ideal, but this is what the recipe called for and I didn't really feel like making the wrong amount of icing. So I went with it.

Once the cake and icing were completed mixed, I scooped out the mixture using a cookie scoop and rolled them into little balls, which I placed on a lined baking tray. I covered the tray with plastic wrap and stuck it in the freezer for about 10 minutes.


Next, I melted the candy melts. I purchased these from Michaels for about $2 a bag. I went with dark chocolate, white vanilla, and pink vanilla. I used a make-shift double boiler by putting a heat proof glass bowl on a pot of simmering water. I started with dark chocolate, stirring until the pieces were completely melted.

I dipped the ends of the lollypop sticks in the chocolate and then stuck them in the cold cake balls. I placed the cake pops back onto the tray to let the chocolate harden. Once I was done with all of the balls, I poured the rest of the chocolate into a tall glass so I could dip them. (No fancy tools here).


I dipped each pop into the chocolate and then carefully moved the stick in a circular motion, so it did not loosen. When I removed the pop from the chocolate I rotated it to get rid of any excess chocolate. Sometimes it helps to tap the stick gently to get the chocolate flowing. Once all the excess chocolate was removed, I coated some of them with sprinkles in red, pink, and violet and then stuck the pops in a styrofoam brick to dry. I then repeated the same steps with the other two candy melt colors.

Once the pops where dry, I decorated the remaining pops (the ones without sprinkles) using the leftover melted candy. I drizzled it over the pops using a spoon while rotating.

After the cake pops were completely dry I put them in clear candy bags and then wrapped them with a twist tie.

Check out Bakerella's website, the original creator for cake pops. She also has a how to video here.

Tah-dah! And there you have it. Super yummy cake pops...


These things are sooo tasty and super moist. Pat absolutely couldn't get enough of them and thinks they were the best dessert I have made to date. I think I agree. These cute little pops are definitely here to stay in this household!


Happy Baking,

Sunday, February 19, 2012

Guinness & Chocolate Cupcakes with Bailey's Frosting

I first tasted this delicious treat before Christmas. For the last two years the office staff at our apartment complex has thrown a present wrapping party. They provide wrapping paper, serve appetizers, play festive movies, and my personal favorite....they rent a cupcake truck. Yes you read that right. The Cupcakory loads up their cute little food truck, complete with serving window and truck mounted cupcake display case, and hangs out all night to give us cupcakes. IT IS AMAZING!!

Anyway, the purpose of that story was that they had a Guinness and chocolate cupcake that I had to grab for Patrick to try, since he loves all-things Guinness. I don't even remember what I ordered for myself because this cupcake blew me away. This was the most moist cupcake I have ever tasted. That pretty much sealed the deal...I had to try to recreate this cupcake.

While researching my new found food love of Guinness and chocolate in a cake-batter goodness...I discovered that it's called chocolate stout cake and is quite popular. There are few wonderful variations using Guinness (or alike); for example the Irish Car Bomb (with whiskey chocolate ganache filling and Bailey's frosting). YUM!

My take was to make Guinness and chocolate cupcakes with Bailey's Irish Cream frosting. Patrick was FULLY supportive of my endeavors and did not object whatsoever. I was so excited to try out the recipe that I made them the following weekend.

For the cupcakes I followed a recipe I found on Epicurious

The recipe says it makes 12 servings - but it certainly does not. It calls for 4 cups flour, 4 cups sugar, and 4 eggs, etc - that's a lot of cake! 12 servings of ginormous slices of cake maybe. So I halved the recipe, which makes about 24 cupcakes:

Guinness and Chocolate Cupcakes:
1 cup Guinness
1 cup unsalted butter
3/4 cup cocoa powder
2 cups flour
2 cups sugar
3/4 teaspoons salt
1/2 tablespoon baking soda
2 large eggs
2/3 cup sour cream

I did not make the icing that the cupcake recipe called for. I wanted something better. I decided to do a twist on my absolute favorite frosting recipe from Magnolia Bakery. It's the same recipe I use when I frost red velvet cupcakes, but I added Bailey's to it. It's wonderfully creamy and not overly sweet, exactly how I like my frosting. Now this recipe makes a lot of frosting. So I made 1/3 of the recipe:

Bailey's Irish Cream Frosting:
2 tablespoons flour
2/3 cups milk
2/3 cups unsalted butter - room temp
2/3 cups sugar
5 tablespoons Irish Cream
1/2 teaspoon vanilla

Follow the creamy vanilla frosting recipe. Let the milk and flour mixture cook for a while and then add the Irish cream before the mixture begins to bubble and get really thick. 5 tablespoons of Irish cream for 1/3 of the recipe was my preference - it's really just to taste. But I found it gave a really nice flavor that wasn't too overpowering. Because of the Bailey's I only used a 1/2 teaspoon of vanilla - but again this was just my preference.


Well needless to say these cupcakes were a hit. One of the best, if not the best, I've ever made. So I made them again when I was home from Christmas. I figured I would share the recipe since I had a several requests.


Happy Baking,

Back to Blogging

I'M BAAAAACK!

My last blog post was October 23, 2011. I blogged about loving the fall....well not much has changed, it still feels like fall.

So for the last four months we've been busy and although there have been days were I felt like blogging, I just didn't have the time. Well today I finally have time. Pat just left for a conference in San Francisco and since I drove him to the airport I am up bright and early. (I've already been grocery shopping this morning - which I must say is a delight on a Sunday at 7:30am!)

So here is a recap of what we've been up to:

We went to Mexico to celebrate Adam & Amanda's Wedding <3 -


We went home to Regina for Christmas -


Where we had long overdue visits with family...

And gave Neeva tons of kisses....

And had a photo shoot with Pam & Matt....

And visited with Kristin and her cute little monkey Tyson :D


And in the New Year....

Mandy and Ryan came to Boston for a visit

We had brunch with friends

We went to my work party....and had too much fun in the photo booth

We did a bunch of other things....but I don't have any photo evidence.

Ok so now that you're up to speed, I'll get on with my next post. It's good to be back

Sunday, October 23, 2011

I Love the Fall

Ok I realize I've been slacking in the blog department lately....but I've been busy and had a cold! Still it's no excuse.

A few weekends ago Maurice, Pat's dad, came to Boston for a visit. It's so nice to have visitors...hint hint to everyone back home ;)

We had a jam packed weekend. Saturday I baked a an Apple pie, we went for a nice walk in the Fells, and that night we went to the Bruins game....which they won by the way. We happened to get all-you-can-eat seats, which I didn't know even existed. I left extremely full, but happy!

All I have to show from this day is this picture:

 mmm I love Apple pie....this recipe was delicious! (Joy of cooking)

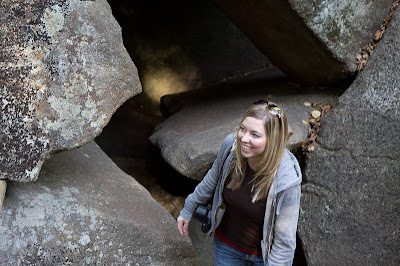
Sunday we drove to New Hampshire. The leaves were starting to turn, so it was quite a beautiful drive. Our first stop was at the Lost River Gorge. This gorge was not too far from the Flume Gorge, which we visited last year around this time. We had a nice picnic outside and then walked through the gorge. It's quite an amazing sight.


My mom's Pentax film camera that she gave to us


Exploring in the caves


After the gorge we headed over to Canon Mountain to take the tramway and check out the foliage. First we went to a lookout point to view the foliage in the valley, the colors were so bright. Then we road the cable car up Canon Mountain and walked through the trails. The view was absolutely beautiful. It was difficult to leave!


We had a such a wonderful weekend and look forward to more visitors :)